How to change key file of AWS EC2 instance after launch
AWS uses key-based authentication for SSH Access to servers. There is 2 types of keys, public and private. Out of which, the public key resides inside a server and the private key remains with the user for login purposes.
In AWS, a private key can only be downloaded once, at the time of key creation. So You need to be extra cautious while storing it.
But, When you use key-based authentication, there are times when you need to change key files, due to security purposes, Or because you have lost the private key or it has been hacked.
In this article, I’ll explain 2 such use cases where you need to change key files and how can you achieve that.
Changing Key using AWS Keys and removing old key
There are 2 such use cases where you need to change Keys used of your Server
- If you lost your keys and there are no other ways to login into the machine
- Due to a security breach, you need to change the key file of your machine
For 1st case, If it was simply missing the key file, the Easiest option to change your key file is re-launching your server with a different key file.
- In this case, if your server has some data which is needed from the old server to the new server, you can create an AMI of that server and launch a new EC2 server/instance with a new key file
2nd case is, If you had a security breach or someone hacked your old key file, or have unauthenticated access to the key, and you want to remove that access.
- In this case, launching a new server from AMI is also risky, because it has the public key file already added to the machine, and AWS will have new key file information after that, it will not remove old file details.
- So to achieve security and gain access to your server back, You need to remove that public file from the server.
- It can be achieved after launching an instance, we will see that also in this article.
Now, We will see steps to do in order to configure the new Key file and removing the old one
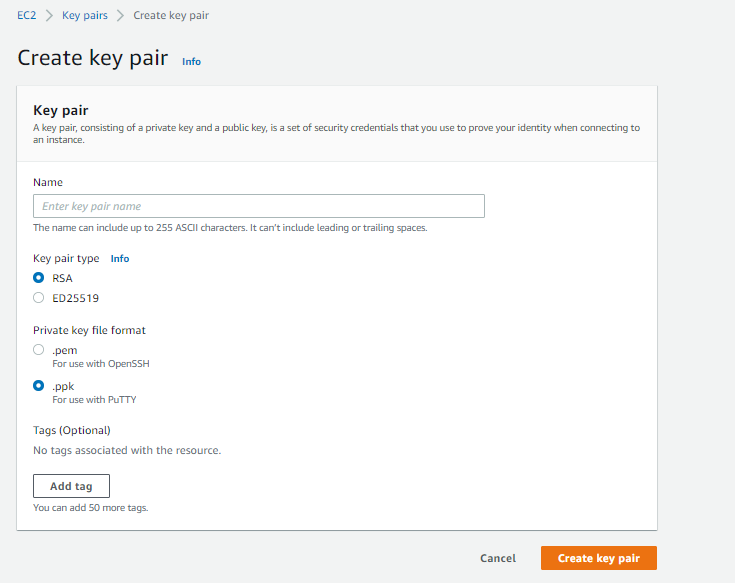
1. Create a new key pair using AWS Console
- Log in to AWS Console
- Click on Services and Select EC2
- After opening EC2 Dashboard, in the left panel, look for Key Pairs and open it
- Click on Create Key Pair

- Enter new key pair name
- Select type as RSA
- Select format as .pem
- Add Tag (Optional)
- and Create
2. Create AMI of current server using AWS Console
- Log in to AWS Console
- Click on Services and Select EC2
- Select instance for which we need to change Keypair
- Select instance, Click on Actions, Select Image and Templates, Select Create Image
- Enter Image name and description
- Select No Reboot – Enable
- Add Tag (Optional)
- and Create Image
3. Launch AMI of current server using new keys – AWS Console
- Log in to AWS Console
- Click on Services and Select EC2
- Click on Launch instance, and follow all required steps
- For a detailed guide on how to launch an EC2 instance, follow this link
- Select new Key pair while launching the instance
3. Remove old key from server
- SSH into machine
- As we are referring to ubuntu AMI Over here, go to the home path’s SSH directory for ubuntu user
cd /home/ubuntu/.ssh- Locate
authorized_keysfile - Open the file and you will be able to see 2 lines, 1 with an old key and 1 with a new key
- Remove old key’s line. (Keep backup in local for safety purposes)
- Save the file and Done!!!
Now, you have successfully launched your server with a new key file and removed the old one.
Security – Achieved!!!
Instance recovery – Done!!!!
Drafted On,
22nd January 2022
DevOps @identicalCloud.com
